Color Panel
DaVinci Resolve-style color grading for Nuke
Overview
The Color Panel brings a familiar, artist-friendly color grading interface to Nuke. Instead of tweaking raw knob values on Grade, ColorCorrect, or ColorLookup nodes, you get interactive color wheels, a top parameter bar, YRGB curves, and range selectors — all in a single dockable panel that follows your node selection in real time. Undo and redo use Nuke's native undo stack.
Opening the Panel
There are two ways to open the Color Panel:
-
Panes menu — Go to the Nuke menu bar and choose
Panes > NELSIG Color Panel. The panel opens as a dockable pane that you can place in any workspace layout.
Supported Node Types
The Color Panel works with three Nuke node classes. Each class exposes different tabs and capabilities:
| Node Type | Primaries Tab | Curves Tab | Ranges Tab | Notes |
|---|---|---|---|---|
Grade |
Yes | — | — | Lift / Gamma / Gain / Offset wheels; Contrast & Pivot in parameter bar |
ColorCorrect |
Yes | — | Yes | Primaries + per-range grading (Shadows, Midtones, Highlights); Saturation in parameter bar |
ColorLookup |
— | Yes | — | Full YRGB curve editor with histogram |
When you select a node that the panel does not support, it displays a "no supported node selected" message and waits for a valid selection.
More node types will be supported in upcoming releases.
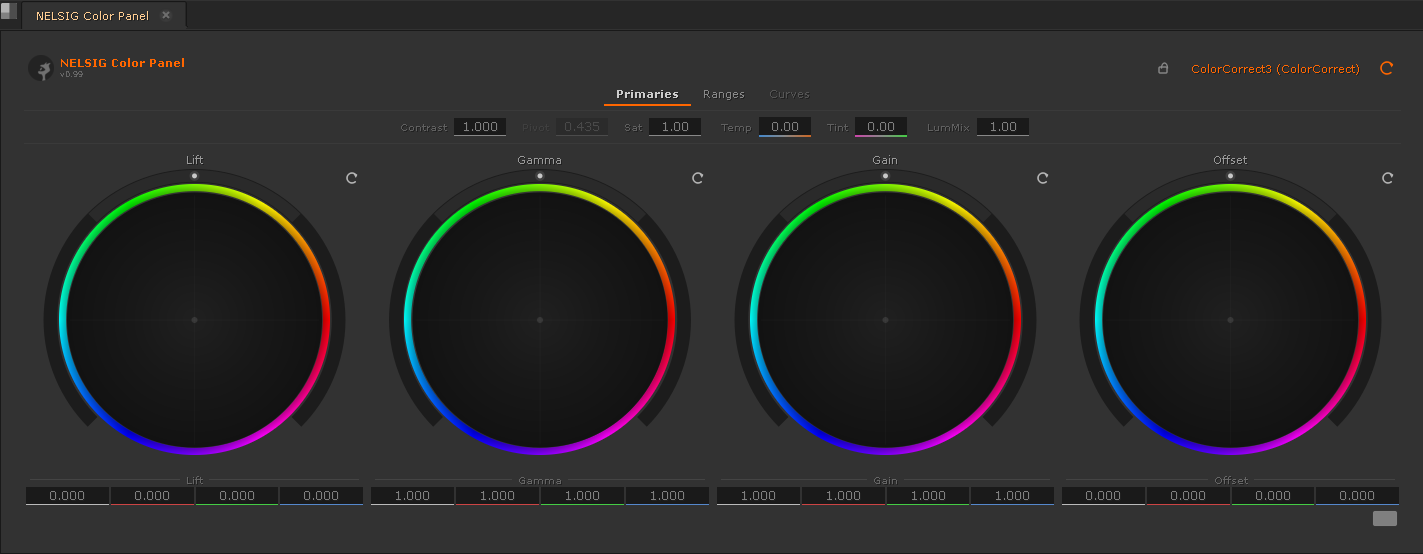
Primaries Tab
The Primaries tab provides four color wheels arranged left to right: Lift, Gamma, Gain, and Offset. Each wheel controls the corresponding CDL parameter of the selected Grade or ColorCorrect node.
CDL Color Wheels
Each wheel uses a CDL (ASC Color Decision List) model internally and maps to the native Nuke knobs as follows:
| Wheel | CDL Role | Neutral Value | Description |
|---|---|---|---|
| Lift | Offset | 0 | Adds a constant to all values; primarily affects shadows |
| Gamma | 1 / Power | 1 | Applies a power curve; primarily affects midtones |
| Gain | Slope | 1 | Multiplies all values; primarily affects highlights |
| Offset | Add | 0 | Adds a constant after the CDL pipeline; uniform shift |
Click and drag inside a wheel to shift the color balance for that parameter. The further you drag from the center, the stronger the color shift. Dragging is sensitive and designed for fine adjustments; hold Ctrl for precision mode.
Master Ring
Each wheel has an outer master ring. Dragging the ring left or right adjusts the luminance component of that parameter uniformly across all channels. This is equivalent to changing the master value (e.g., master Gain) without introducing a color shift.
Luma Intensity
Below each wheel sits a luma intensity slider that controls how strongly the wheel's adjustment affects the luminance channel relative to the chrominance channels. At 0 the wheel adjustment is purely chromatic; at 1 it applies equally to luminance and chrominance.
Top Parameter Bar
Above the wheels, a horizontal parameter bar provides quick access to global grading controls. The available parameters depend on the selected node type:

| Parameter | Range | Default | Available On | Description |
|---|---|---|---|---|
| Contrast | 0 – 4 | 1 | Grade, ColorCorrect | S-curve contrast around the pivot point |
| Pivot | 0 – 1 | 0.18 | Grade only | The midpoint around which contrast is applied |
| Saturation | 0 – 4 | 1 | ColorCorrect only | Global saturation multiplier |
| LumMix | 0 – 1 | 0 | Grade, ColorCorrect | Blends between the original and graded luminance |
| Temperature | -1 – +1 | 0 | Grade, ColorCorrect | Cool (blue) to warm (orange) color shift |
| Tint | -1 – +1 | 0 | Grade, ColorCorrect | Green to magenta color shift |
Curves Tab
When a ColorLookup node is selected, the panel switches to the
Curves tab. This provides a full YRGB curve editor with live dragging, an
integrated histogram, and match color functionality.
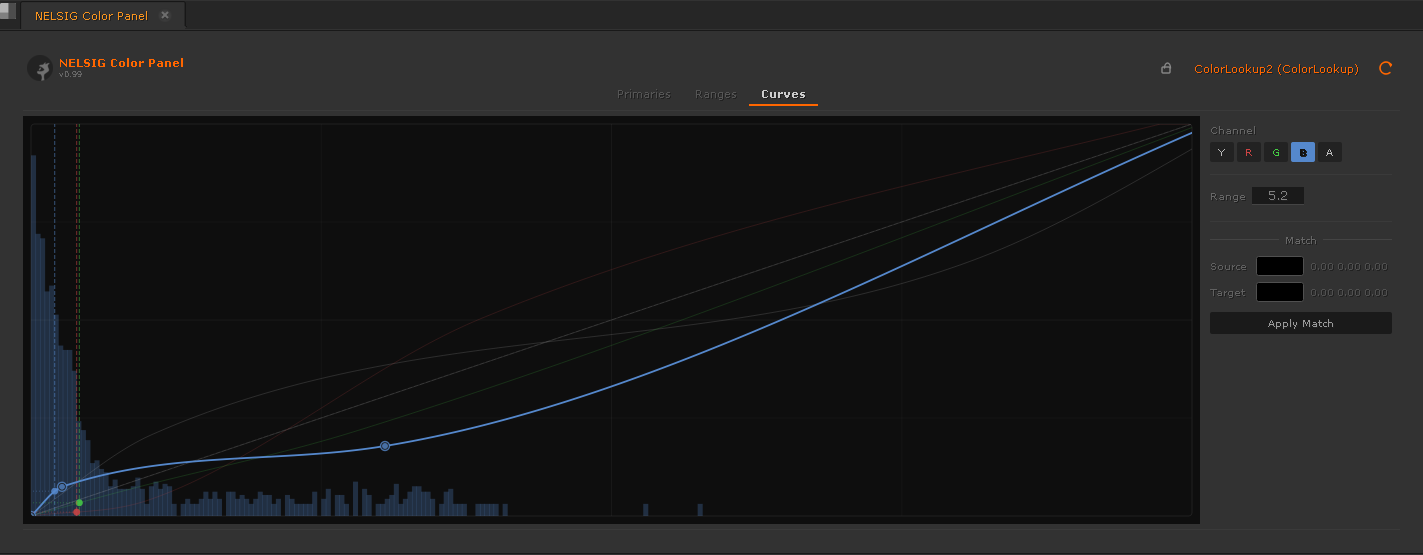
Ctrl+click or double-click on the curve to add control points. Drag existing points to reshape the curve. Right-click a point to delete it. Changes are applied to the ColorLookup node in real time as you drag.
Channel Controls
The curve editor provides the following channel controls:
- Channel selector — Switch between Master (Y), Red, Green, and Blue curves. Each channel can be edited independently.
- Gang toggle — When ganged, dragging the Master curve affects all RGB channels equally. Ungang to edit Master independently.
- Per-channel intensity — Each channel has an intensity slider that scales the curve's deviation from the identity line.
- Range selector — Limit curve edits to a specific tonal range (shadows, midtones, highlights).
Live Histogram
A live histogram is drawn behind the curve, showing the tonal distribution of the current frame from the input of the ColorLookup node. The histogram updates when you scrub the timeline or change the input.
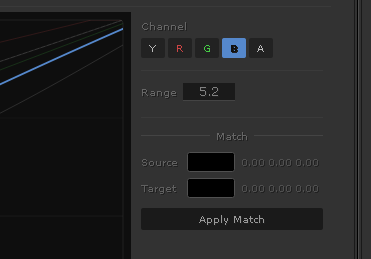
Match Color
The Match Color feature allows you to sample a source and target color from the Viewer and automatically generate a curve that maps one to the other. This is useful for color matching between shots.
Ranges Tab
The Ranges tab is available when a ColorCorrect node is selected. It
provides interactive control over the shadow, midtone, and highlight boundaries
that ColorCorrect uses for its per-range grading.
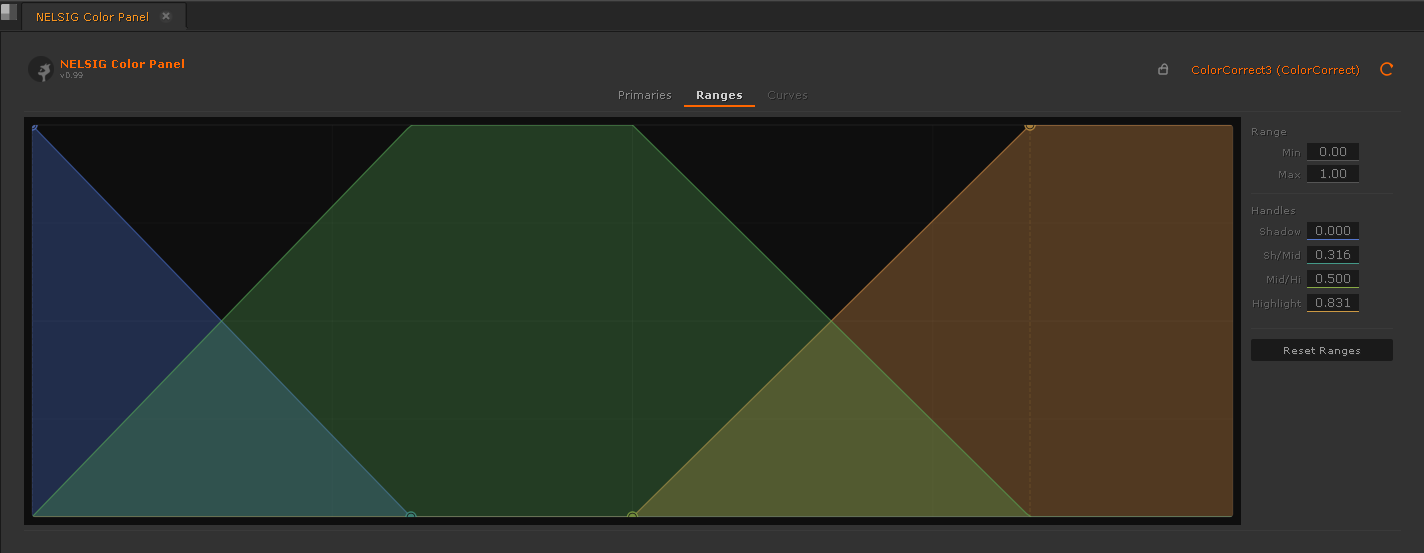
- Shadow/Highlight boundaries — Drag the boundary markers to define where shadows end and highlights begin. The midtone range is automatically computed from these boundaries.
- Interactive slider — A visual gradient slider shows the current range distribution. Drag the handles to adjust boundaries while seeing the crossfade zones.
- Per-range grading — Once ranges are defined, the Primaries tab wheels apply to the selected range (Shadows, Midtones, Highlights, or Master).
Global Controls
Reset Button
The orange Reset button in the panel header resets the current tab's parameters to their default (neutral) values:
- Primaries tab — Resets all four wheels to their neutral positions (Lift=0, Gamma=1, Gain=1, Offset=0) and clears the parameter bar values.
- Curves tab — Resets all YRGB curves to the identity line (straight diagonal), removing all control points.
- Ranges tab — Resets shadow/highlight boundaries to the ColorCorrect defaults.
Node Adoption
The Color Panel automatically adopts the currently selected node in the DAG. When you click a different Grade, ColorCorrect, or ColorLookup node, the panel instantly updates to reflect that node's values and switches to the appropriate tab.
- Selecting a
Gradenode switches to the Primaries tab. - Selecting a
ColorCorrectnode switches to the Primaries tab (with Ranges tab available). - Selecting a
ColorLookupnode switches to the Curves tab. - Selecting a non-supported node shows a placeholder message; the last adopted node's state is preserved.
CDL Mapping Reference
The Color Panel uses an internal CDL model and maps it to each node type's native knobs. The tables below document the exact mapping.
Grade Node Knobs
| Panel Control | Nuke Knob | Neutral | CDL Role |
|---|---|---|---|
| Lift wheel | lift | 0 | Offset |
| Gamma wheel | gamma | 1 | 1 / Power |
| Gain wheel | gain | 1 | Slope |
| Offset wheel | offset | 0 | Add |
| Contrast slider | multiply | 1 | — |
| Pivot slider | white_clamp / internal | 0.18 | — |
ColorCorrect Node Knobs
| Panel Control | Nuke Knob | Neutral | Scope |
|---|---|---|---|
| Lift wheel | shadows.offset | 0 | Per-range or Master |
| Gamma wheel | midtones.gamma | 1 | Per-range or Master |
| Gain wheel | highlights.gain | 1 | Per-range or Master |
| Offset wheel | master.offset | 0 | Per-range or Master |
| Saturation slider | saturation | 1 | Global |
| Range boundaries | range | — | Shadow / Highlight split |
ColorLookup Node Knobs
| Panel Control | Nuke Knob | Notes |
|---|---|---|
| Master (Y) curve | lut.master | Applied to all channels equally |
| Red curve | lut.red | Red channel only |
| Green curve | lut.green | Green channel only |
| Blue curve | lut.blue | Blue channel only |
Mouse & Controls Reference
Mouse Controls
| Action | Behavior |
|---|---|
| Left-click + drag on wheel | Shift color balance for that parameter |
| Left-click + drag on master ring | Adjust luminance (master value) for that parameter |
| Ctrl + drag on wheel | Precision mode — fine adjustment |
| Double-click on wheel | Reset that single wheel to neutral |
| Ctrl+click on curve | Add a new control point |
| Double-click on curve | Add a new control point (alternative) |
| Left-click + drag on curve point | Move control point (live update) |
| Right-click on curve point | Delete control point |
General
| Action | Behavior |
|---|---|
| Global reset | Click the orange reset button (top-right) |
| Switch tabs | Click Primaries / Curves / Ranges tab |
| Undo / Redo | Ctrl + Z / Ctrl + Shift + Z (standard Nuke undo) |
Troubleshooting
| Problem | Cause | Solution |
|---|---|---|
| Panel says "No supported node selected" | Selected node is not a Grade, ColorCorrect, or ColorLookup | Select a supported node in the DAG. The panel adopts it automatically. |
| Wheels do not update the Viewer in real time | The panel's node is not connected to the viewed Viewer input | Make sure the controlled node is upstream of the active Viewer input. |
| Curves tab is grayed out | A Grade or ColorCorrect node is selected (curves only work with ColorLookup) | Select a ColorLookup node or create one from the panel. |
| Ranges tab is grayed out | A Grade or ColorLookup node is selected (ranges only work with ColorCorrect) | Select a ColorCorrect node to access the Ranges tab. |
| Temperature / Tint have no effect | The Gain and Offset knobs are already at extreme values | Reset the node and try again, or reduce existing Gain/Offset adjustments. |
| Panel does not appear in the Panes menu | Node Graph Tools is not installed or not loaded | Verify the installation by checking ~/.nuke/node_graph_tools/ exists. See the Install guide. |
| Match Color produces unexpected results | Source and target samples are from different color spaces | Ensure both samples are taken from the same color space (typically the working space). |
Input Devices — Plugin Development
The Color Panel supports hardware and software control surfaces through a plugin-based driver layer. Drivers translate messages from external devices (MIDI controllers, OSC apps, Tangent panels, etc.) into normalised events that the panel understands.
Supported Protocols
| Driver | Protocol | Dependency | Status |
|---|---|---|---|
| osc_driver.py | OSC (UDP) | None (built-in parser) | Complete |
| midi_driver.py | MIDI CC / Note | mido + python-rtmidi | Complete |
| tangent_driver.py | Tangent Hub TCP | Tangent SDK | Stub |
| eucon_driver.py | AVID EuCon | AVID SDK | Stub |
Writing a Driver Plugin
To add support for a new device:
- Create a file in
input_devices/drivers/named<protocol>_driver.py - Subclass
BaseDriver - Set the three metadata attributes:
DRIVER_ID,DRIVER_NAME,DRIVER_VERSION - Implement
connect(config),disconnect(),is_connected() - Call
self.emit(event)for every incoming message
The DeviceManager discovers your driver automatically on next launch. Only files matching *_driver.py are scanned.
Minimal example
# input_devices/drivers/example_driver.py
from __future__ import print_function, division

from ..base_driver import BaseDriver
from ..event_types import WheelDeltaEvent, WHEEL_LIFT

try:
    import some_sdk
    _AVAILABLE = True
    _UNAVAILABLE_REASON = ""
except ImportError as _e:
    _AVAILABLE = False
    _UNAVAILABLE_REASON = str(_e)


class ExampleDriver(BaseDriver):
    DRIVER_ID      = "example"
    DRIVER_NAME    = "Example Device"
    DRIVER_VERSION = "1.0"

    @classmethod
    def is_available(cls):
        return _AVAILABLE

    @classmethod
    def unavailable_reason(cls):
        return _UNAVAILABLE_REASON

    def get_config_schema(self):
        return {
            "host": {"type": "str",  "default": "localhost", "label": "Host"},
            "port": {"type": "int",  "default": 5000,        "label": "Port"},
        }

    def connect(self, config):
        if not _AVAILABLE:
            return False
        # ... start your listener thread ...
        self._connected = True
        return True

    def disconnect(self):
        # ... stop thread, close sockets ...
        self._connected = False

    def is_connected(self):
        return self._connected
Config schema
get_config_schema() returns a dict describing the parameters your driver needs. The settings UI uses this to generate input fields automatically.
Thread safety
Drivers typically run a listener in a background thread (UDP socket, MIDI port, etc.).
Call self.emit(event) from any thread — the DeviceManager routes events
through a thread-safe queue and flushes them to the main Qt thread at 60 Hz via a QTimer.
Never touch Qt widgets or Nuke knobs directly from your driver thread.
Event Types
Import from input_devices.event_types. All events are Python 2.7 compatible (no dataclasses).
| Event | Fields | Description |
|---|---|---|
WheelDeltaEvent(wheel, dx, dy) |
wheel: str, dx/dy: float |
XY movement of a color wheel (trackball, touch pad, jog) |
MasterDeltaEvent(wheel, delta) |
wheel: str, delta: float |
Rotation of the master luminance ring |
WheelResetEvent(wheel) |
wheel: str |
Reset a single wheel to neutral |
ButtonEvent(button_id, pressed) |
button_id: str, pressed: bool |
Named button press/release (e.g. "reset_all") |
CurvePointEvent(channel, point_index, x, y) |
channel: str, point_index: int, x/y: float |
Direct curve point manipulation (not yet implemented) |
TransportEvent(action) |
action: str |
Playback controls: play, stop, prev/next frame (not yet implemented) |
Wheel constants: WHEEL_LIFT, WHEEL_GAMMA, WHEEL_GAIN, WHEEL_OFFSET, ALL_WHEELS
Channel constants: CH_MASTER, CH_RED, CH_GREEN, CH_BLUE, ALL_CHANNELS
MIDI Mapping Files
MIDI drivers use external JSON mapping files in input_devices/mappings/.
Users can create custom mappings for any controller.
{
    "version": 1,
    "description": "My Controller",
    "cc": {
        "1": {"type": "wheel_delta", "wheel": "lift", "axis": "x"},
        "7": {"type": "master_delta", "wheel": "lift"}
    },
    "notes": {
        "36": {"type": "wheel_reset", "wheel": "lift"},
        "39": {"type": "reset_all"}
    }
}
CC types: wheel_delta (requires axis: "x" or "y"), master_delta.
Note types: wheel_reset (requires wheel), reset_all, or any custom button_id.
OSC Protocol Reference (iPad App)
The OSC driver expects these addresses:
/grading/<wheel>/delta     float:dx  float:dy
/grading/<wheel>/master   float:delta
/grading/<wheel>/reset
/grading/button/<id>      int:pressed (0 or 1)
/grading/transport/<action>
Where <wheel> is lift, gamma, gain, or offset.
Testing without Nuke
from input_devices import DeviceManager

def log_event(event):
    print("Got:", event)

dm = DeviceManager()
dm.set_event_callback(log_event)
print("Available:", dm.available_drivers())
dm.connect("your_driver_id", {"port": 5000})
# ... send messages from your device ...
dm.disconnect_all()
For bug reports or feature requests, visit the GitLab repository.